Slope Gliders, and your first slope flight
Slope Gliders, also known as slope soarers, are a subject near and dear to my heart. The reason is that I learned to fly with these machines. In retrospect, maybe not the best way to learn: throwing an airplane over the side of a hill!
I was by myself (no instructor), had saved up for this thing, and spent weeks building it. Note: I do NOT recommend that you go it alone! You can also learn to fly on the slope, but an instructor will save you a lot of time and money..

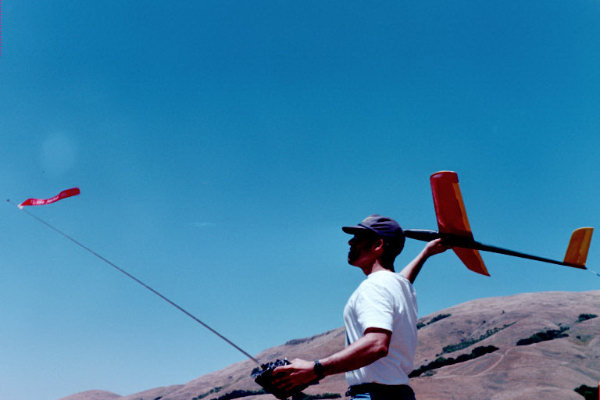
Note the flag on the transmitter antenna. The pilot is about to launch into the wind.

The pilot is all concentration as he makes passes parallel to the slope. Hopefully he won't completely miss the scenery. This is the life!
How do these gliders work? You've probably seen seagulls flying by the beach, without flapping their wings, for long periods of time. How is that possible?
Well, if there is an upward sloping piece of ground (eg a hill or cliff) or even a wall or building, the conditions may be right. Just add a steady breeze that is more or less perpendicular to this rising feature.
When the wind hits the cliff/wall/building, the air is forced to rise upwards. It is this rising air that seagulls, and slope gliders, use as their "free ride".

By flying back and forth along the cliff/wall/building, the savy pilot can stay in the air indefinitely (well, as long as the wind keeps its speed and direction). In fact, pilots can gain height, and start doing fast passes, and even aerobatics! And all without an engine / fuel tank, or an electric motor.
To see some exciting videos of advanced slope gliders, click here:
http://www.californiasailplanes.com/videos/videos.htm
For a first rc slope glider pilot, I would recommend as must-haves:
a) an instructor,
(b) a gentle, low slope with a large grassy landing area in front of it, and a steady breeze blowing into it, and
(c) a slow and stable "polyhedral" glider.
If you HAVE to, choose two out of these three must-haves. You can also do your first short gliding flights on a large flat field, it that is what you have available.
Some options for beginners' slope gliders are the Thunder Tiger "Whisper" and "Windstar", the Great Planes "Spirit" and the Goldberg "Gentle Lady". All of these are readily available from major hobby retailers.
Your first slope flight -If at all possible, have an instructor check out the plane, and perform the first flight. -If no instructor, check and double check that the control surfaces move in the direction and amount specified in the plane's instructions. Also check that the center of gravity is correct.
Otherwise stop and fix, do not fly!
-Face toward the slope, into the wind. Ideally, the wind will be about 5 to 10 mph (check you weather forecast :)), in a direction close the perpendicular to the slope. -Remind yourself that your goal here is not sustained flight until you crash. It's a short controlled hop (think "Wright Brothers").
-Throw the plane smoothly and gently forward into the wind. Aim and release the plane at the horizon. Bring your throwing hand back to the transmitter.
-If setup correctly, the plane will continue forward in a straight line. Make small corrections to the rudder (left and right) if necessary, to keep it going straight. The keyword here is "small" corrections.
-Allow the plane to lose altitude slowly and then let it land at the bottom of your small hill.
You may need to give a small amount of "up" (back) elevator, right before touchdown. You've just completed your first flight!
You will probably be shaking with excitement. Walk down the hill, retrieve the airplane, go back up and throw again! Start making gentle S-curves with the rudder while the plane is on the way down.
When you are ready for sustained flight, launch into a stronger wing or over a larger or steeper hill.
If you have an instructor, they may do this with you on the first flight, using a "buddy-box". Make your turns away from the hill, resulting in an extended figure eight pattern as shown below.


